How to Create Python Packages
Dec 14, 2021
A Python package is a collection of modules. A module is the easiest way to import and reuse existing Python code that’s developed by other programmers. In simple terms, a package is a module, but not all modules are packages. So, the question that raises is: what differentiates a package from a module? The response lies in a file named __init__.py, which indicates that the folder directory is a package. In this article, we’ll walk you through the main concepts and steps about how to create, install, publish, and test your own Python package locally and globally.
To start, we’ll define a function that calculates the square of a given number. The “squarenum.py” file contains the function script, as shown in the code snippet below:
def calculate_square(num):
    """
    Function that returns the square of a number

    Args:
        num(float): a number

    Returns:
        float: square of the number
    """

    return num**2
Our goal is to turn this function into a Python package. To do so, we first guide you step-by-step how to create your package locally. In doing so, you will learn how to structure your package’s directory, install it and test it. Finally, we’ll provide insights about how to publish your package into the Test PyPi and Pypi third-party software repositories for Python to make your package available worldwide.
Local Distribution of a Python Package
Let’s first look at how you can structure, create, and install your Python package locally.
Prerequisites
Here’s what you’ll need to get started and creating your package distribution for local installation in macOS:
- First, ensure that you already have pip installed. Pip is a package manager. To check if you have pip, run the following command in your terminal:
pip -V
- Next, create a virtual environment to safely install your package. Using a virtual environment will simplify the task of installing and removing your package without affecting your current Python configuration. Luckily, Python3 and later versions come with a pre-installed environment manager called venv. For this example, you’ll create a virtual environment named “myenvironment.” Go to your main project’s directory and run the following command:
python3 -m venv myenvironment
As a result, a new folder named “myenvironment” is created containing a brand new Python virtual environment.
Structuring Your Package Folder
To create your local package, here’s the structure that your package will need to follow:
└── squarenum_distribution
    ├── setup.py
    └── squarenum_package
        ├── __init__.py
        └── squarenum.py
This table provides a detailed description of each file:
| File | Description | |||
| squarenum_distribution | Main project’s directory. | |||
| setup.py | Python file required for pip installing your package distribution. | |||
| squarenum_package | Parent package’s directory. Note that the folder’s name will be the name of your package. | |||
| __init__.py | Python file executed when importing the package. It is required to import the directory as a package. Remember to leave this file empty. | |||
| squarenum.py | Python file that contains the logic of your package, in this case, your function. | |||
Let’s look at how we can scaffold your package’s folder.
- To start, go to your terminal and create the two main folders “squarenum_distribution” and “squarenum_package” using the “mkdir” command. Here’s how you can do it:
mkdir squarenum_distribution
- Next, you’ll need to create the rest of the files in their corresponding folders by simply running the “touch” command. Here’s an example you can follow:
cd squarenum_distribution/squarenum_package
touch setup.py
- Once you’re done making all the files for your package’s directory, you’ll need to modify and include additional content for the “setup.py” and “squarenum.py” files. We recommend using the “nano” command in your terminal for this task. Alternatively, you can use your text editor of choice. With that said, ensure to include the following script for “setup.py”:
nano setup.py
from setuptools import setup
setup(name='squarenum_package',
      version='0.1',
      description='Square of a number',
      packages=['squarenum_package'],
      zip_safe=False)
Note that the “name” and “packages” parameters inside the setup() function correspond to the name of the “squarenum_package” folder that you created in step 1. In other words, these parameters are named likewise your package folder. Keep that in mind!.
To learn more about the contents of the “setup.py” file, check out this link.
- Next, you’ll need to repeat step 3 to include your function script in the “squarenum.py” file, as shown below:
nano squarenum.py
def calculate_square(num):
	"""
	Function that returns the square of a number

	Args:
		num(float): a number

	Returns:
		float: square of the number

	"""

	return num**2
- Finally, go to your main package’s folder ./squarenum_distribution and type the “tree” command:
cd squarenum_distribution
tree
As a result, you’ll obtain the structure of your package that we were looking for.
├── setup.py
└── squarenum_package
    ├── __init__.py
    └── squarenum.py
Installing and Testing Your Package in a Virtual Environment
After structuring your package folder, you’ll need to install and test your package distribution locally using a virtual environment:
- In the console, go to the root folder that contains your “myenvironment” virtual environment. Ensure you are outside the “myenvironment” folder.
- Activate your virtual environment using the following command:
source myenvironment/bin/activate
Note that your command line’s prompt has changed. It should now be preceded by the name of your virtual environment, as shown below:
(myenvironment) [user]@[hostname]:[current_directory]$
- With the virtual environment activated, go to the ./squarenum_distribution folder and run the following command:
cd squarenum_distribution
pip install .
You will get the following output, which indicates that your package has successfully installed in your virtual environment:
Processing ~/squarenum_distribution
Installing collected packages: squarenum-package
  Running setup.py install for squarenum-package ... done
Successfully installed squarenum-package-0.1
- Now, let’s import our brand new Python package. In the console, open a Python interpreter:
python
- Import your package distribution by running the following command:
from squarenum_package import squarenum
Here “squarenum” is the Python file that contains your function logic and “squarenum_package” is your package name.
- Finally, test your function using the following command: \
squarenum.calculate_square(7)
49
Note that we used the dot notation to call the “calculate_square()” function inside the “squarenum” file. The dot notation means that you’re referring to something inside a file.
Installing and Testing Your Package as Part of Your Python Environment
To install and test your package distribution locally as part of your Python environment, just repeat the same steps from the previous section but without using a virtual environment. Keep in mind that any changes you make to your system-level Python setup will be more difficult to undo.
Global Distribution of a Python Package
Let’s take our local package distribution a step further. We’ll now make our package available in a repository so that other users can download and use it. In other words, we’ll make our package globally. We’ll be using the Python Package Index, abbreviated as Pypi, which is the official third-party software repository for the Python programming language.
We’ll start by publishing our package into Test Pypi to check whether everything in our package is working fine. And then, as the cherry of the cake, we’ll publish it into PyPI to make it officially available to the Python community.
Prerequisites
The instructions for creating a global package somewhat differ from those for a local package, but are still quite straightforward. As a starting point, you’ll ensure to comply with the following:
- First, check whether you have already installed pip, run the following command in your terminal:
pip -V
- Next, install twine. This is a utility for publishing Python packages on PyPI. In your terminal, type:
pip install twine
- As the next step, create a virtual environment in your system to safely install your package. For this section of the article, we’ll create two virtual environments: one for the Test Pypi, and another for Pypi. To do so, go to your main project’s directory and run the following command:
python3 -m venv mytestpypi_environment
python3 -m venv mypypi_environment
As a result, you’ll have two new folders named “mytestenvironment” and “mypypienvironment” containing a brand new Python virtual environment.
Structuring Your Global Package Folder
Here’s the structure that your package will need to follow:
└── squarenum_distribution_Pypi_test
    ├── setup.py
    └── squarenum_package
        ├── README.md
        ├── __init__.py
        ├── license.txt
        ├── setup.cfg
        └── squarenum.py
Note that the global package folder structure will slightly differ from that of a local package. You’ll notice three new files: “README.md,” “license.txt,” and “setup.cfg.” Since your package will be globally available, you’ll need a signature that tells the world: “Hey, this masterpiece was created by me!” Also, it is recommended to provide your end-users with instructions of how to install and run your package distribution. Here’s where the three new “amigos” come into play. The following table provides an overview of each file.
| File | Description |
| squarenum_distribution_Pypi_test | Main project’s directory. |
| setup.py | Python file required for pip installing your global package distribution. |
| squarenum_package | Parent package’s directory. Note that the folder’s name will be the name of your package. |
| README.md | File that contains information and instructions of how to use your package. |
| __init__.py | Python file executed when importing the package. It is required to import the directory as a package. Remember to leave this file empty. |
| license.txt | Text file that contains information about your global package’s licensing. Most package creators follow the MIT license template. |
| setup.cfg | File containing your global package’s metadata. |
| squarenum.py | Python file that contains the logic of your package, in this case, your function. |
Let’s now look at how to structure your global package’s folder.
- As a cheatsheet, we can reuse the instructions provided in the Structuring your Package Folder section, where the commands “mkdir” and “touch” were very handy.
- After creating all of the files for your global package’s directory, you’ll need to modify and include additional content for the “setup.py,” “setup.cfg,” and “squarenum.py” files. We again recommend using the “nano” command in your terminal for this task. Include the following script for the “setup.py:”
nano setup.py
from setuptools import setup

setup(name='squarenum_package',
      version='0.1',
      description='Square of a number',
      author='Salomon Marquez',
      author_email='phd.smarquez@gmail.com',
      packages=['squarenum_package'],
      zip_safe=False)
Note that we included two additional parameters inside the setup() function “author” and “author_email.” If you want to understand a bit more about the content of the “setup.py” file, you can consult this link.
- Next, you’ll need to include the following script into the “setup.cfg” file:
nano squarenum.py
[metadata]
description_file = README.md
- Finally, include your function script in the “squarenum.py” file, as shown below: \
nano squarenum.py
def calculate_square(num):
	"""
	Function that returns the square of a number

	Args:
		num(float): a number

	Returns:
		float: square of the number

	"""

	return num**2
Publishing Your Package to the Test Pypi Repository
With your global package folder structured, you can now publish your package to the Test Pypi repository. Here’s how to upload it.
- In your console, go to ./squarenum_distribution_PyPi_test and run the following command:
cd squarenum_distribution_PyPi
python setup.py sdist
- Then, upload your package distribution to Test PyPi by running:
twine upload --repository-url https://test.pypi.org/legacy/ dist/*
- When prompted, enter your Test Pypi account username and password. Recall that creating a Test PyPi account was a prerequisite. This is the right time to create one if you have not already done so.
Uploading distributions to https://test.pypi.org/legacy/
Enter your username:
Enter your password:
- In your browser, log in to your Test PyPi account.
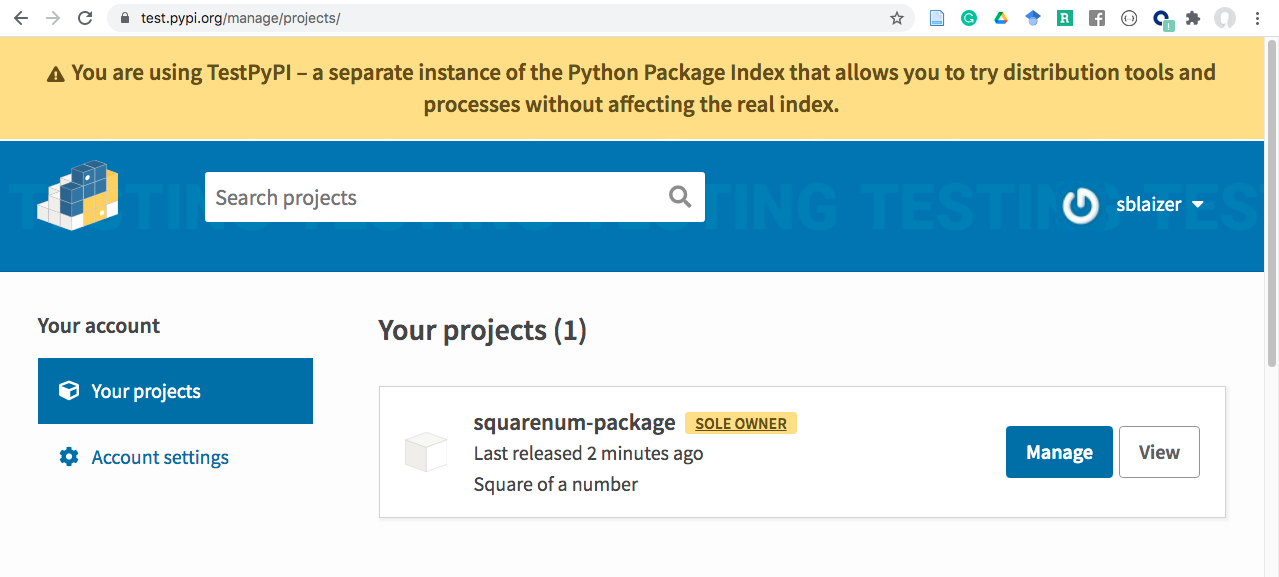
- Finally, go to your projects section and check that your global package distribution has been uploaded.
Important:
If your global package distribution name contains an underscore symbol, this is changed into hyphen when it is uploaded to the Test PyPi site.
Downloading and Testing Your Package From Test PyPi
It’s now time to run a few quality checks on your global package. To download and test your package from the Test PyPi repository, follow the next steps:
-
In the console, go to the root folder that contains your “mytestenvironment” virtual environment. Ensure you’re outside the “mytestenvironment” folder.
-
Activate your virtual environment using the following command:
source mytestenvironment/bin/activate
Note that the prompt of your command line has changed. Now, It should be preceded by the name of your virtual environment as shown below:
(mytestenvironment) [user]@[hostname]:[current_directory]$
- With the virtual environment activated, install your package distribution using the following command and your package name:
pip install --index-url https://test.pypi.org/simple/ squarenum-package
You’ll get the following output:
Collecting squarenum-package
  Downloading https://test-files.pythonhosted.org/packages/c9/f0/387fd3f3edeb693d24bf191191d444ed87709463484d6cc7340896555515/squarenum_package-0.1.tar.gz
Installing collected packages: squarenum-package
  Running setup.py install for squarenum-package ... done
Successfully installed squarenum-package-0.1
- Let’s now import our brand new Python package. In the console, open a Python interpreter:
python
- Import your global package distribution by running the following command:
from squarenum_package import squarenum
“squarenum” is the Python file that contains your function logic and “squarenum_package” is your package name.
- Finally, test your function using the following command:
squarenum.calculate_square(7)
49
Note we used the dot notation to call the “calculate_square()” function inside the “squarenum” file. The dot notation means that you’re referring to something inside a file.
Publishing Your Package to the PyPi Repository
If you’ve made it this far, then you have already created, published, downloaded, and tested your global package distribution. Our starting point was to check whether our package behaved as expected when completing the task of publishing it to the Test PyPi repository. If everything went OK, our final step will be to publish it to the PyPi repository. Let’s find out how our package gets ready for production.
- In your console, go to ./squarenum_distribution_PyPi_test and upload your package distribution to PyPi by running the following commands:
cd /squarenum_distribution_PyPi_test
twine upload dist/*
- When prompted, enter your PyPy account username and password. Recall that creating a PyPi account was a prerequisite. This is the right time to create one if you have not already done so.
Uploading distributions to https://upload.pypi.org/legacy/
Enter your username:
Enter your password:
- In your browser, log in to your PyPi account.
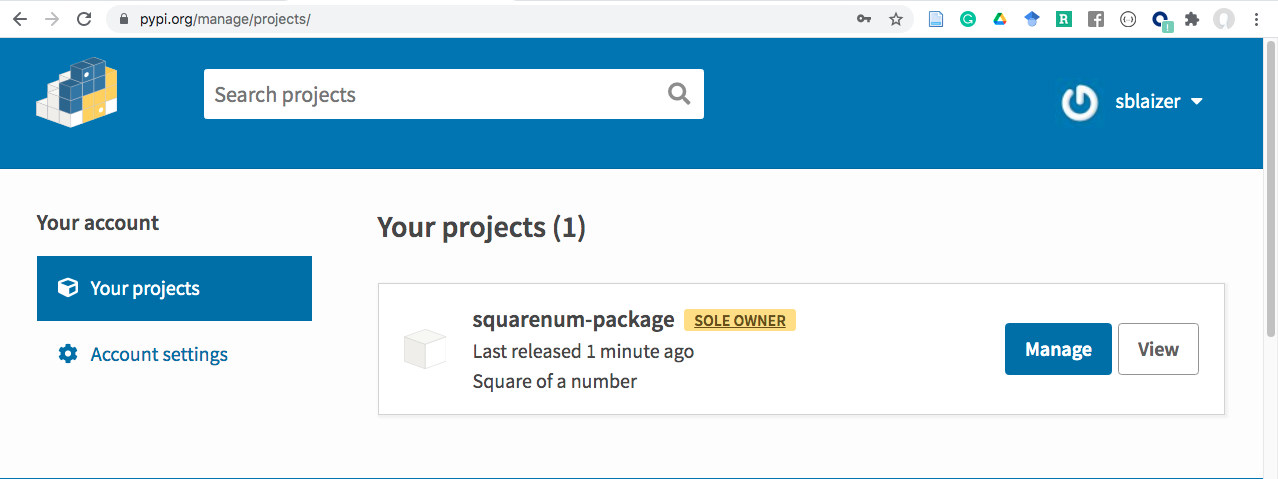
- Finally, go to your projects section and check that your global package distribution has been uploaded.
Important:
If your global package distribution name contains an underscore symbol, this is changed into hyphen when it is uploaded to the PyPi site.
If your global package distribution name contains an underscore symbol, this is changed into hyphen when it is uploaded to the Test PyPi site.
Downloading and Testing Your Package From PyPi
This is the last step of our journey. To download and test your package from the PyPi repository, follow these steps:
-
In the console, go to the root folder that contains your “mypypi_environment” virtual environment. Ensure you are outside the “mypypi_environment” folder.
-
Activate your virtual environment using the following command:
source mypypi_environment/bin/activate
Note that the prompt of your command line has changed. Now, It should be preceded by the name of your virtual environment as shown below:
(mypypi_environment) [user]@[hostname]:[current_directory]$
- With the virtual environment activated, install your global package distribution using the following command and your package name:
pip install squarenum-package
You’ll get the following output:
Collecting squarenum-package
  Downloading https://files.pythonhosted.org/packages/c9/f0/387fd3f3edeb693d24bf191191d444ed87709463484d6cc7340896555515/squarenum_package-0.1.tar.gz
Installing collected packages: squarenum-package
  Running setup.py install for squarenum-package ... done
Successfully installed squarenum-package-0.1
- Now, let’s import our brand new Python package. In the console, open a Python interpreter:
python
- Import your global package distribution by running the following command:
from squarenum_package import squarenum
“squarenum” is the Python file that contains your function logic and “squarenum_package” is your package name.
- Finally, test your function using the following command:
squarenum.calculate_square(7)
49
Note that we used the dot notation to call the “calculate_square()” function inside the “squarenum” file. The dot notation means that you’re referring to something inside a file.
Conclusion
Python packages allow developers to save time by reusing scripts, functions, and objects that others have developed. Let’s recap what we learned so far in this article.
First, we took baby steps to figure out how to structure and create a package’s directory for local installation. This task was the foundation to take our package a step further and publish it to the Test PyPi repository. We realized that the structure of the parent folder for a local compared to a global package slightly changed. This is because we needed to include files that represented our signature for licensing and handling instructions on how to use our package. Finally, we published our package for global distribution in the PyPi repository.
Here are a few takeaways about Python packages:
- Remember that once you’ve published a package, you are responsible for keeping it up-to-date and addressing any security issues.
- Python packages are versatile: you can pack not only functions but also objects, which is useful for OOP-based applications.
- You can learn more about Python packages by exploring existing packages. Have a look at the structure of packages like Numpy and Pandas.